When homeowners think “new roof,” they picture shingles, maybe underlayment—rarely the slim strips of metal channeling water away from every vulnerable joint. Yet flashings are the precision components that make a roofing system watertight. Ignore them, and even premium shingles can’t save you from slow rot, mold, stained ceilings, and premature deck failure. Invest in them, and you extend roof life, prevent hidden structural damage, and protect interior finishes.
This guide explains what flashings do, the different types, how and why they fail, material options, code and manufacturer considerations, proper installation principles, maintenance tips, costs, and red-flag symptoms homeowners in Chicagoland should watch for. Armed with this knowledge, you can ask smarter questions, budget wisely, and avoid “band‑aid” fixes that never address the real leak path.

What Is Roof Flashing?
Roof flashing is any formed, corrosion‑resistant material installed to seal transitions, penetrations, and breaks in the roofing surface—redirecting water safely onto the shingle (or panel/tile) drainage plane and into gutters. Wherever roofing meets a vertical surface, projects outward (chimneys, skylights, dormers), changes direction (valleys, hips), or is interrupted by a penetration (vents, pipes), flashing stands between you and a leak.
Core Functions
Water Diversion: Captures concentrated runoff and re‑routes it over, not under, the roof covering.
Capillary Break: Interrupts suction that can pull water laterally beneath shingles.
Expansion Accommodation: Allows dissimilar materials (masonry, wood, metal) to move without tearing sealant films.
Drainage Continuity: Bridges gaps so the designed drainage plane remains unbroken.
Why Flashings Are Critical (Beyond “Stopping Leaks”)
| Hidden Risk | How Proper Flashing Prevents It |
|---|---|
| Deck rot & delamination | Keeps standing & driven rain off OSB/plywood seams |
| Ice dam back-up intrusion | Seals transition points where meltwater can refreeze & creep upward |
| Interior mold & IAQ issues | Stops chronic dampness in insulation cavities |
| Masonry saturation | Counter flashing sheds water off chimney shoulders & mortar joints |
| Siding decay & paint failure | Kick‑out flashings prevent roof-wall runoff grooving siding/fascia |
| Attic energy loss | Dry insulation maintains intended R‑value |
A single missing $12 kick-out flashing can channel thousands of gallons of concentrated runoff per season into siding layers—leading to hidden rot around window heads and wall sheathing.
Key Types of Roof Flashings (Residential Focus)
Below are the most common (and commonly mis-installed) flashings we address on Chicagoland homes.
1. Step Flashing (Sidewall Flashing)
Individual “steps” (typically 5″×7″ or 4″×6″) interwoven with each shingle course where a roof slopes into a vertical wall (dormer, sidewall). Each piece laps the lower and is covered by the shingle above—creating a shingle-like cascade of metal.
Best Practice: Minimum 2″ vertical leg against wall; 3″ horizontal leg on roof. Interleave—never surface-nail through exposed horizontal legs.
Upgrade: Use pre-finished aluminum or copper in coastal/corrosive environments or where aesthetics matter.
2. Headwall (Apron) Flashing
Continuous L‑shaped flashing installed where the top of a sloped roof terminates into a wall (shed roof into second-story wall). Lower leg sits on shingles; vertical leg tucked behind siding or counter-flashed.
Critical Detail: Properly shim & seal behind WRB (weather-resistive barrier) with self-adhered membrane where codes allow.
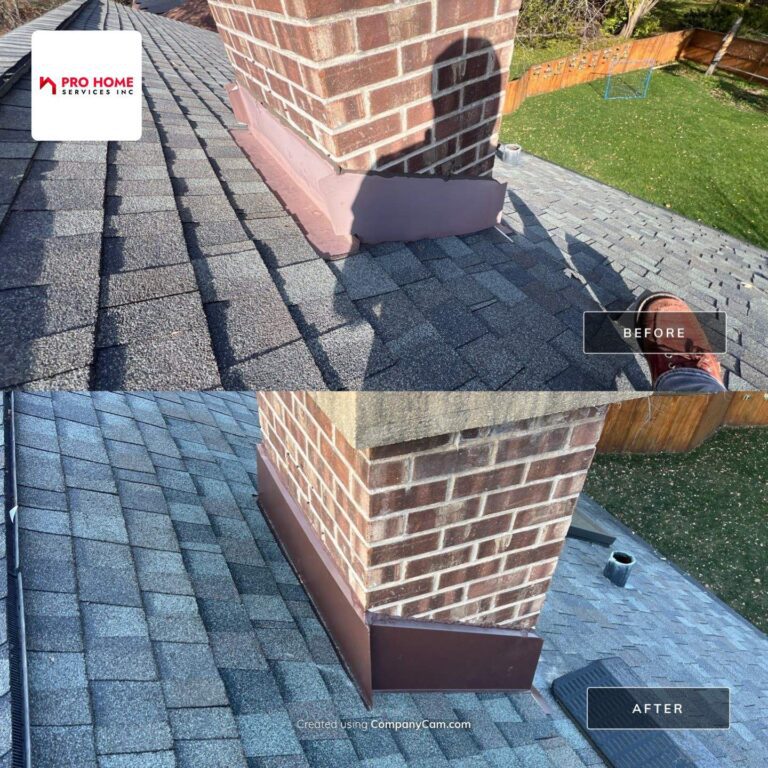
3. Counter Flashing
Secondary flashing that overlaps base or step flashing (common at chimneys or masonry walls) to create a two-part system. Allows replacement of roof covering without chiseling out embedded flashing.
Masonry Method: Reglet cut (⅞” deep) with counter flashing hem tucked & sealed—not simply surface-caulked.
4. Chimney Flashing System
Usually combines: base flashing (at lowest side), step flashing (along sides), cricket/saddle flashing (up-slope of wider chimneys), and counter flashing.
Cricket Requirement: Chimneys 30″+ wide (perpendicularly) to roof slope should have a cricket to split runoff & snow loads.
5. Valley Flashing
Channels converging roof planes. Options:
Open Valley: Exposed W‑shaped or V‑shaped metal (galvanized, aluminum, or copper). Faster drainage & easier inspection.
Closed-Cut / Woven: Shingles overlap; metal may still be present beneath for waterproofing.
Best Practice: Minimum 24″ wide, center ribbed where heavy snow/ice expected.
6. Drip Edge (Eave & Rake Edge Flashing)
L‑shaped metal along eaves & rakes. Prevents capillary wicking into decking edge, protects fascia, guides water into gutters.
Sequence: Under underlayment at rakes; over ice & water shield at eaves (local code & manufacturer specifics apply).
Chicago-Area Note: Ice shield often extends 24″ inside the warm wall line—proper overlap with drip edge is critical.
7. Kick-Out (Diverter) Flashing
Angled extension at the bottom of a step flashing run that kicks water away from the wall into the gutter. Most frequently omitted piece leading to wall rot.
Sizing: Vertical leg matching step flashing; diverter angle deflects rather than “scoops” debris.
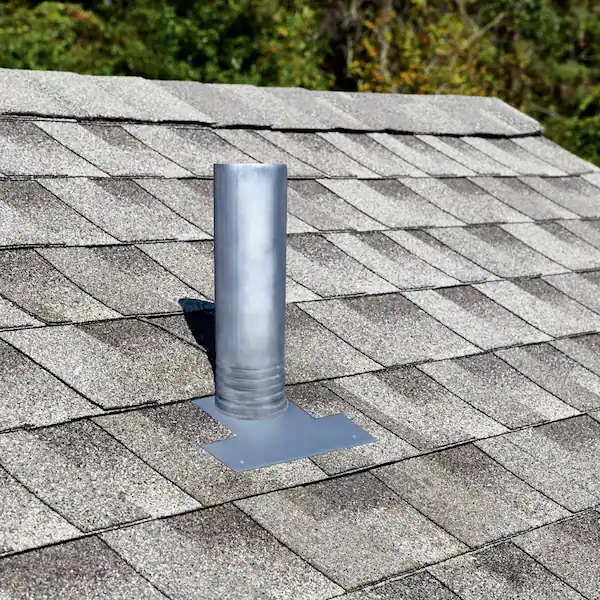
8. Pipe Boot / Vent Pipe Flashing
Consists of metal base with an integral neoprene (or silicone) collar forming a compression seal around plumbing vent stacks.
Failure Mode: UV and ozone degrade neoprene (10–15 year range). Replace boots when cracking starts—before leaks.
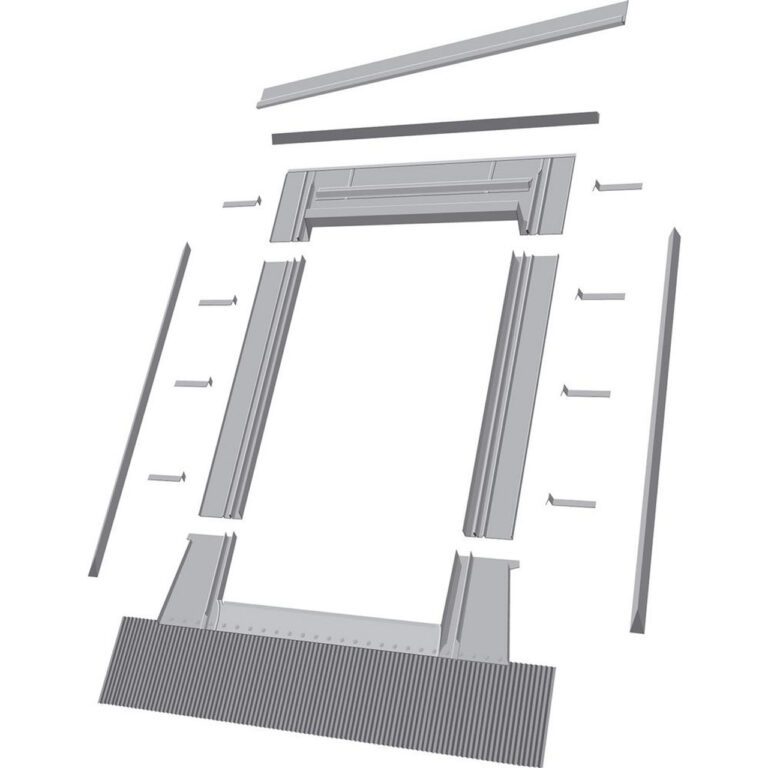
9. Skylight Flashing Systems
Factory kits (step + head + sill + side pieces) integrated with ice/water membrane. Modern skylights (Velux, Fakro) rely on layered system: underlayment collar, sill flashing for drainage, interwoven side pieces, and saddle/head flashing.
10. Roof-to-Wall Transition (Chimney Chase / Dormer Front) Flashings
Combination of headwall and sometimes pan flashing if low slope transitions to steeper walls.
11. Parapet / Coping Flashings
On low-slope sections or additions—metal cap (coped) over parapet walls to shed water away from wall layers.
12. Deck Ledger / Porch Roof Intersections
Requires flashing to prevent water infiltration behind siding where deck or porch roofs meet main wall plane.
Flashing Materials: Pros, Cons & Use Cases
| Material | Pros | Cons | Typical Uses |
| Galvanized Steel | Economical, strong, paintable | Can rust if coating damaged | Step, valley, chimney base |
| Aluminum (pre-finished) | Corrosion resistant, color-matched, lightweight | Reacts with alkaline masonry if direct contact, softer | Drip edge, step, headwall |
| Copper | Exceptional longevity, malleable, aesthetic patina | High cost, potential staining on some surfaces | High-end chimneys, valleys, historic homes |
| Stainless Steel | High strength, corrosion resistant, no patina bleed | More difficult to form, cost | Coastal, harsh chemical exposure areas |
| Lead | Extremely malleable, longevity (historically) | Environmental/handling concerns, cost | Older chimney flashings (rarely used new) |
| PVC / TPO Formed Boots | Flexible, UV resistant (quality brands) | Not universal aesthetic match, limited color | Pipe penetrations on low-slope membranes |
| Neoprene Collars | Easy install, flexible | UV degradation over time | Pipe boot inserts |
Upgrade Tip: If investing in premium shingles (impact-rated, designer profiles), do not undercut system durability by installing low-grade flashing metals.
Common Flashing Failures & Root Causes
Omission (Missing Kick-Out / Cricket): Leads to saturated sheathing, stucco swelling, chimney backwash.
Face-Nailed Step Flashing: Nail holes become direct entry points; water bypasses shingle laps.
Tar or Caulk Reliance: Sealants are maintenance items—not primary waterproofing. Overuse often hides poor metal layering.
Improper Overlaps: Less than 2″ end laps on continuous flashing can capillary pull water backward.
Trapped Debris in Valleys: Organic buildup diverts water sideways beneath shingle edges.
Dissimilar Metal Corrosion: Copper runoff onto bare galvanized steel accelerates galvanic decay.
Aged Boots: Cracked neoprene collars allow slow intermittent drips—often misdiagnosed as condensation.
Masonry Mortar Failures: Counter flashing losing reglet grip causes lift & water entry behind base flashing.
Diagnosing Flashing Problems (Homeowner Checklist)
| Symptom | Possible Flashing Issue |
| Stained ceiling near exterior wall | Sidewall / headwall flashing failure or ice dam back-up |
| Damp chimney chase interior | Counter flashing separation or missing cricket |
| Soft siding below roof-wall junction | Missing kick-out flashing |
| Moldy insulation around vent pipe | Deteriorated pipe boot collar |
| Water stains only after wind-driven rain | Lifted step flashing or ridge cap blow-under (check overlaps) |
| Peeling paint on fascia ends | Drip edge missing or too short, gutter backflow |
Installation Best Practices (What to Insist On)
Layering Principle: Always shingle-style: lower components first, upper overlapping without reverse laps.
Mechanical Waterproofing First: Membranes & metal geometry do the work; sealants purely supplemental.
Ice & Water Shield Integration: At valleys, penetrations, and eaves—ensure membrane extends beyond most vulnerable seams.
Minimum Metal Gauges & Dimensions: Avoid undersized step flashing pieces; follow manufacturer (e.g., ≥ 2″ vertical, 3″ horizontal, 75 mm × 125 mm typical).
Reglet vs Surface Caulk: For masonry, demand saw-cut reglet or properly formed counter flashing—not just bent metal caulked to brick face.
Kick-Out Fabrication: Pre-formed or site-bent with smooth diverter surface; avoid tiny bent tabs that clog with granules.
Pipe Boot Replacement During Re-Roof: Don’t reuse old cracked boots to “save” a few dollars.
Fastener Selection: Compatible corrosion-resistant fasteners (galvanized or stainless) to match flashing metal and avoid galvanic mismatch.
Code & Manufacturer Considerations (Illinois / Chicagoland Notes)
Ice Barrier: Many local jurisdictions require ice barrier extending at least 24″ inside the warm wall line at eaves—coordinate with drip edge laps.
Valley Treatment: Open metal valleys often recommended for heavy snow / ice shedding in suburban Chicago suburbs.
Kick-Out Enforcement: Increasingly cited by inspectors due to widespread moisture intrusion cases—ensure inclusion on plans & change orders.
Manufacturer Warranty Protection: Improper flashing (or reuse of rusted components) can void extended roofing warranties.
Maintenance & Inspection Schedule
| Task | Frequency | Notes |
| Binocular ground scan | Quarterly | Look for lifted flashing, missing shingles at transitions |
| Attic check after heavy rain | 1–2×/year | Focus around chimneys, vents, skylight wells |
| Gutter cleaning | Spring & Fall | Prevent overflow behind drip edge |
| Detailed roof pro inspection | Every 2 years (annually for older roofs) | Documented photo report |
| Pipe boot collar replacement | 10–15 years or at first cracking | Consider lifetime boots (silicone) during reroof |
| Sealant touch-up (reglet / counter) | 5–7 years | Use high-quality compatible sealants |
Winter Tip: After freeze-thaw cycles, check for ice dam staining near headwalls; this can reveal inadequate underlayment & flashing integration.
Cost Considerations
| Flashing Component | Typical Add-On / Replacement Cost Range (Residential) |
| Kick-out flashing retrofit | $150–$350 each (access & siding removal affect) |
| Pipe boot replacement | $125–$250 per penetration |
| Chimney full re-flash (with counter & cricket) | $800–$2,000+ (size, masonry condition) |
| Open metal valley upgrade (pair) | $300–$600 per valley (material choice) |
| Copper upgrade (select areas) | 2–4× galvanized pricing |
Costs vary with access, roof pitch, material, and local labor rates. Investing early in proper flashing usually costs a fraction of structural repairs (sheathing replacement, interior drywall, insulation remediation) triggered by chronic leaks.
DIY vs Professional: Where the Line Is
Appropriate DIY: Replacing a cracked rubber pipe collar (if comfortable on roof, using proper safety). Clearing debris from open valleys.
Leave to Pros: Chimney re-flashing, skylight system integration, fabricating custom kick-outs, modifying step flashing under existing siding courses, working on steep-slope or multi-story roofs. Mistakes here compound quickly.
Safety note: Falls remain the number one residential construction hazard—always prioritize proper PPE and tie-off if accessing the roof.
Sustainability & Long-Term Value
Choosing durable flashings (copper, stainless, heavier-gauge aluminum) reduces life-cycle replacement waste. Dry assemblies preserve insulation R-value, reducing energy use. Preventing moisture intrusion also extends siding and framing lifespan—lowering the home’s embodied carbon footprint by avoiding premature material replacement.
Frequently Asked Questions (FAQs)
Q: Can I just re-caulk a leaking chimney flashing?
A: Caulk is a short-term patch. Lasting repair usually involves re-establishing proper step & counter flashing sequence and (if needed) adding a cricket.
Q: My home inspector noted “missing kick-out flashing.” Urgent?
A: Yes—especially if there is visible siding staining or wall softness. The longer water channels behind siding, the more hidden rot accumulates.
Q: Are open metal valleys better than closed-cut?
A: Open valleys drain faster, are easier to inspect/clear, and shed ice better—advantages in Midwestern freeze-thaw cycles.
Q: How often should pipe boots be replaced?
A: Standard neoprene collars last ~10–15 years; upgrade to silicone or metal storm collars with longer service life during reroofing.
Q: Is copper worth the cost?
A: On complex chimneys or high-visibility valleys, copper’s longevity and aesthetic can justify its premium—particularly if you plan long-term ownership.
Q: What’s the #1 most commonly omitted flashing locally?
A: Kick-out flashings at roof-to-wall terminations.
Action Plan for Homeowners
Schedule a Baseline Flashing Audit: Especially if roof >8 years or showing interior stains. Request annotated photos.
Prioritize Vulnerable Zones: Chimneys, valleys, skylights, wall transitions.
Upgrade During Reroof: Replace all flashings; avoid reusing rusted or paint-flaked metal.
Document Work: Keep photos & material specs—supports manufacturer warranty claims and resale disclosures.
Set Calendar Reminders: Spring & fall inspections, gutter cleanings, and 2-year pro assessment.
Conclusion
Flashings may be small in square footage, but they carry outsized responsibility for roof performance and interior dryness. Thoughtful material selection, meticulous installation, and disciplined maintenance transform them from afterthoughts into strategic protectors of your investment. Proactive attention now prevents emergency leaks later—protecting structure, comfort, health, and curb appeal.
If you’d like a professional flashing assessment or photo-documented maintenance plan in Chicagoland, Pro Home Services is ready to help. Call us at 630.790.0800. A dry home isn’t luck—it’s layered, detailed craftsmanship.